Category Archives: Mariadz refit

Post-Biscay maintenance at Vigo

I am no longer captain of my ship and I am back to being maintenance boy with a long list of problems that need resolving.

We have already spoken to the marina who have been incredibly accommodating and will send a team of people to see us in an hour or so.

In the interim I decide to take a trip to the top of the mast, to try and understand why we had the chafe on our green spinnaker halyard. I take a look and a number of pictures but it is difficult to see what has caused it.

I am thinking that on the way down I could swap out the spreader lights, one of which is slightly faulty – still working but not as bright. That is a forlorn hope and I don’t get round to it!

I have now looked at the boom block and how it was positioned and know why this happened. Youtube and the internet isn’t always your friend and I should have checked this earlier rather than after eight hours of fantastic twin headsail sailing at 8+ knots. Still a new block is a small price to pay and we think the sheet for the headsail can be cut and still retain enough length to be used properly. The problem appears to be where I attached the block, which was as far back on the boom as I could get it. This meant that it was slightly obstructed by the main sheet blocks which meant it didn’t deploy properly and was at an angle. This resulted in the block being mangled by the rubbing of the sheet and damage from this to the line itself.

Probably most importantly is to try and sort out the Whitlock drive system, this could be as easy as a loose bolt in the workings that is obstructing the gears. Anyway fingers crossed.

While I am messing about with the steering I may as well check whether there is excessive play in the steering, which would have made the autopilot work harder.

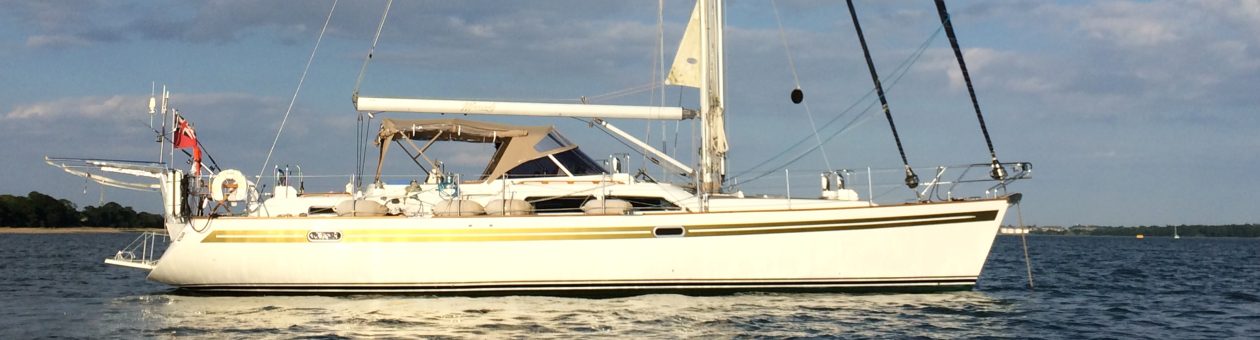
So first up is the rigging. Firstly let me introduce our rigger. The marina have sent their rigging expert, Laureano Wizner. It was only afterwards that they asked me if I knew who he was: a former European sailing champion and americas cup contestant. At that stage, we thought he was just a really good rigger! Laureano climbs our 70 foot mast like a monkey jumping from section to section, checking our rig as he goes. I watch open mouthed. We do quite a bit while he is up there including setting up the sail so that he can see exactly what happens. He comes down with lots of photos and an explanation. Apparently the green halyard is rubbing against the top drum of the headsail. We discuss what can be done but actually the simplest solution is to use the red halyard which has suitable clearance, as checked when Laureano jumped up the mast again. He takes away our two lines to be cut and sorted out. When he returns he has also used the core of our dyneema lines and spliced these into two large circles which are to be threaded through the hoops in the boom for our block to stop the problem with the block not deploying correctly. A simple and elegant fix and a man talented enough to knock that up really quickly. In fact the whole thing is fixed in an afternoon and accompanied by a ridiculously cheap bill! I also go to the chandlery to buy replacement blocks and we are back ready to downwind sail.

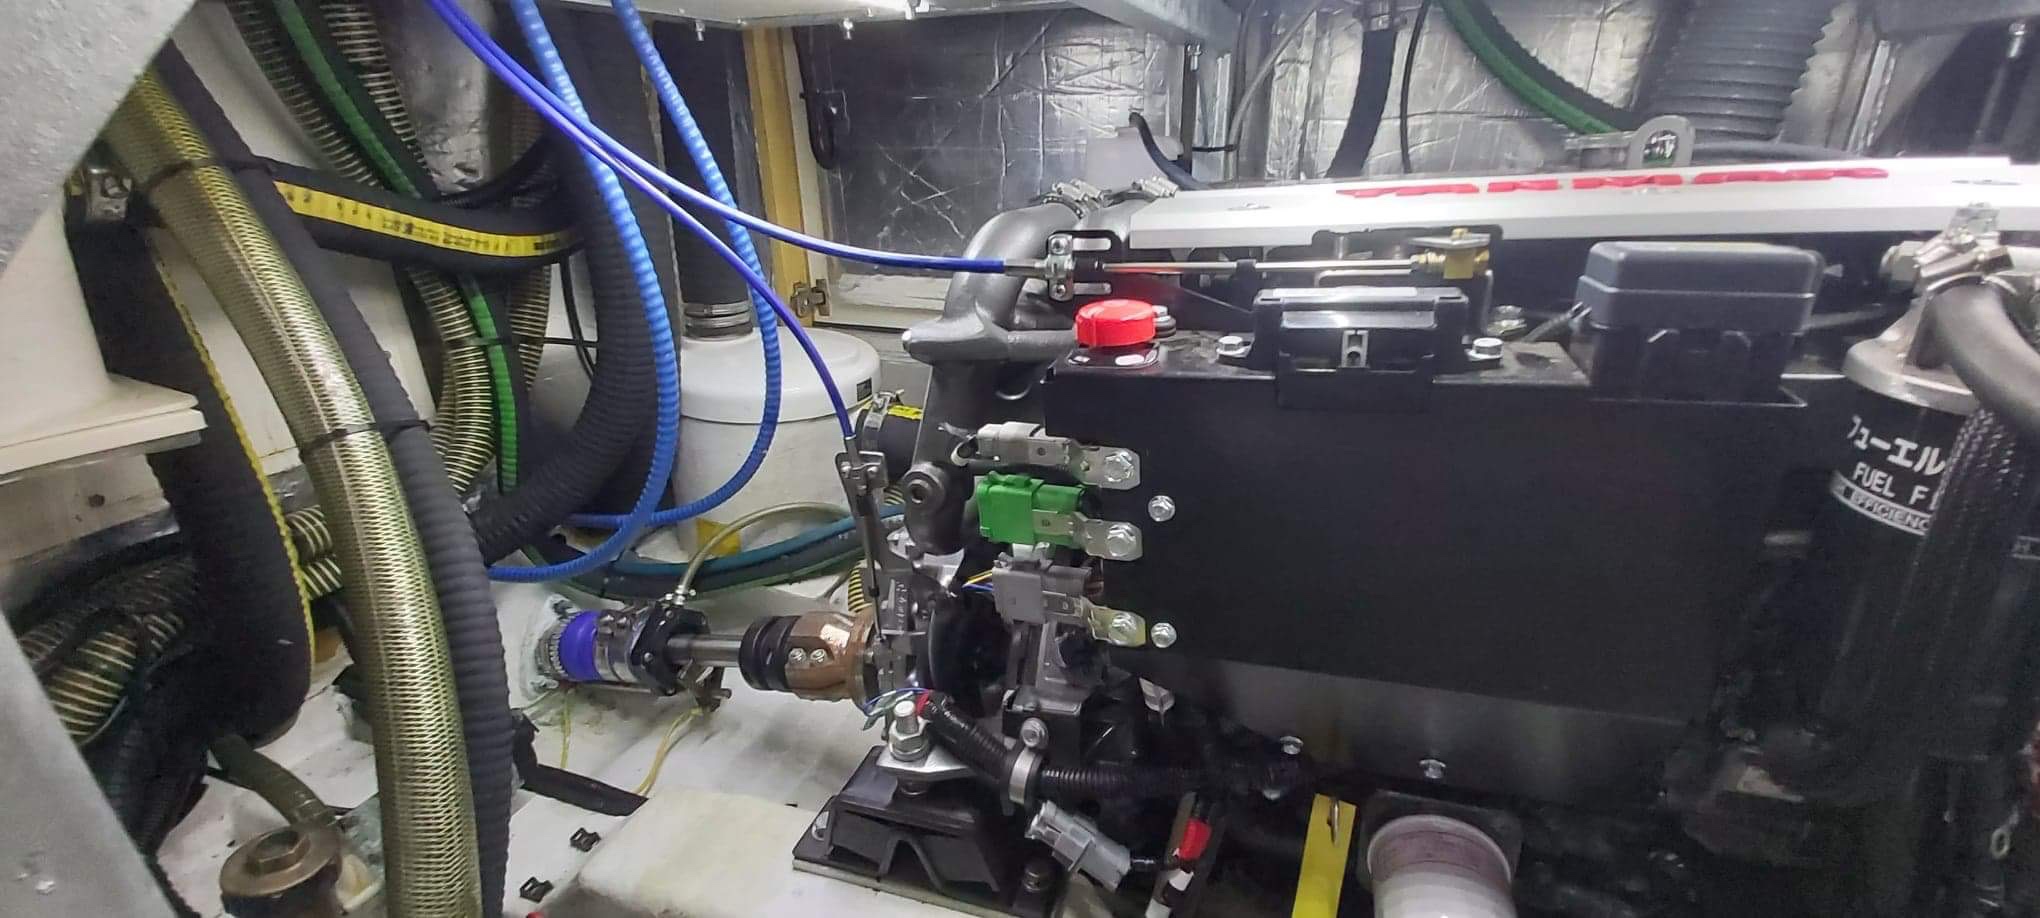
Onto the Whitlock drive to hopefully stop us having to hand steer the whole way. I have spoken to the expert in Southampton. The problem could be a loose screw that has dropped into the gears and is blocking the wheel turn although this would not usually stop it in exactly the same place every time. Still we can hope. Cliff sends me detailed instructions including photos of how to disassemble the drive and get to the inner workings, it doesn’t look to difficult so let’s give it a go. Firstly, I will need to extract the mechanical part of the autopilot. This piece of equipment is held by four bolts to a metal plate which is itself bolted to the hull. Initially I decide to undo the large bolts holding the plate to the hull. Two of these move easily enough, simultaneously moving the almost inaccessible nut under the plate. But I can get these sorted. The other two will not budge. I intend to use my new torque wrench but then notice that it is a half inch rather than the 3/8 for my socket set – that will be an adapter on the shopping list! I speak to the yard who helpfully cut a metal pole to act as an extension and provide greater leverage. This works and now I have the heavyweight plate loose. On to the four smaller bolts that hold the Whitlock drive to the plate. The first takes a bit of pressure but eases and we are going. Unfortunately the second isn’t budging until finally it does, as it sheers quarter of an inch down the thread – great. Another problem but I will come back to that. Bolt three helpfully does exactly the same, double great and just my luck. The fourth bolt actually comes out as it should and we are close. The electrical side is very simple, there are two pairs of wires one providing power and the other the control from the autopilot. These are live/neutral pairs so having marked one set with tape to connect them up correctly, I set about removing these. Now I have the, really quite heavy, drive out of the lazarette. We can now see what we have to deal with. It is exactly the same as the pictures that i have so once I can resolve the two sheered bolts removing the plate will be a cinch!

I have asked the yard if it is possible to use one of their benches to do the work which promises to be quite messy and ingeniously gives my access to a large number of curious Spanish engineers who may be able to help. Unfortunately that doesn’t work out as despite using corrosion x and wd40 to try and break the corrosion locking the bolt to the case and cutting a slot into the bolt with an angle grinder, we still can’t free the bolts. It is time to call professional help. Unfortunately, the mechanic isn’t available til the next day which means we have another day to wait rather than the single overnight we had hoped for. We are now being significantly delayed with no guarantee of fixing the problem. It will be a real shame if our planned 1,500 mile journey in two weeks is reduced to less than half of that!

The next day the mechanic arrives at just after 9am. I explain that I would like to work with him so I can understand it and he says no problem, he will give me a call about 11ish and I assume that he has something to work on first. Just after 11am I get the call that the mechanic is ready for me. I arrive in the yard where he has set up an impromptu workbench in the back of his van. The Whitlock is already in bits but now he needs the detailed instructions on my iPad to get into the workings. I am pleased with his success and I believe he used a torch to superheat the bolt to break its seal before using mole grips to undo it but I am guessing. Anyway we get into the workings and the culprit is clear. There is a chain that drives the arm that attaches to our steering, this is controlled by some gears and the sprocket on this has two teeth missing. He has located one of them in all of the gunk but this part needs replacing. I am quickly on the phone to Cliff who is really helpful. He has the exact same drive on his shelves which was water damaged and this caused the electronics to stop working. It was two weeks old at the time. He will tear it apart retrieve the sprocket and send it to me. All at a very reasonable price. This is fortunate since he has informed me that a replacement would be over £9,000 (This was a mistake since I had confused matters by thinking it was a higher spec model – in the end the replacement would be a shade over £2,000, a paltry two boat tokens, almost cheap!). However, this will take time and then it needs to be shipped to me in Spain in a post brexit world. Clearly, we are going to be hand steering for a little while. The mechanic has taken half of a day with two of them to do this work and he kindly boxes it up for me ready for when I have the spare delivered.

We are as far as we can go but the rig is fully functional and we have a plan for the autopilot. A plan that doesn’t fill us with joy but a plan all the same.

Now for the dreaded part, the bill. We have had immediate attention from all services in the yard and I can’t speak highly enough about how professional and helpful the team are at Davila marina, Vigo. I would recommend it to anyone needing post Biscay maintenance and let’s admit it, this is probably a fair few of us. The mechanic had two of them working on it for several hours and was a shade over €100, the brilliant rigger was double that and again we had a few of them working for hours sorting us out. Everywhere else I have been the bill would have been double or triple that! You would also have been lucky to get anyone to look at it for a few weeks. Thank you for the fantastic facilities and brilliant people at Vigo!

Blog updates

A note to any readers out there. I am trying to catch up on all of the refit and some of the sailing we have done. There will be quite a few blogs going up over the next few weeks including:

Stainless anchor and chain
Safety gear
Teak cockpit seating
Rig and sails, refurb of twin headsail
SSB
Toe rail
Fridge
Fridge freezer control panels
Frameless windows
Headlining
Tensile awning and cockpit tent
Hull work – copper coat and gold stripe
Engine room refurb
New soleboards
Various saloon wood improvements repairs
Toilet pipes and toilet servicing, in and out pumps
Whale manual pump servicing
Water pump – Marco
Grey waste pump service
LEDs with dimmer problems in forepeak
Extra sockets with usbs in bunk room
New tap and water filter
Water maker
Hinge replacement
Locks on lockers
Lithium batteries
Cockpit tent and tensile awning
Teak decks
Motorhome sold

I will try and put these up in a rough chronological order but it does mean that some news will start to appear down the list a little, especially as the list gets updated regularly.

So, happy reading and I hope it is enjoyable and useful.

You have to love a list….

One thing my father and I have in common is making sure there are lists for the things we need to do. It is easy to make the job of managing these lists a full time job but it is also important to make sure you don’t forget those jobs that need to be done.

On a boat these lists can take a life of their own and rapidly increase, some say much faster than the ticking off of items on the list. However, I am like a man possessed with a real deadline to get a load of jobs done and a few days, with Maria staying near our granddaughter. The back of the list is broken and I am finding it difficult to find new tasks to add. Some of these will be future blogs so you have been warned now that you have seen the extent of the list, there are many more items off the bottom of the page….

New sails

Although, in the years of our ownership, Mariadz is reasonably well travelled and often used, we have not been excessive (ab)users of the sails even if they are used whenever possible.  A number of people had told us that the sails had life in them yet but we had decided that before we go we wanted to be ready for the next ten years and that meant new sails.

We had already spoken to Dolphin Sails about new sails for number of years and originally we were quite happy with their quote until we asked them to refresh it and were told that there was a 10% uplift due to currency fluctuations (in an environment where the Pound had crashed against other currencies!).  We didn’t go back to them after that. We were also interested in combining this work with the rig work being done to make sure that these were perfectly in tune.  That led us to one sails who work closely with evolution rigging and we spent some time speaking to John Parker about our needs.

In due course, the quote came in which included three new sails and storm sails. We agreed that the existing twin headsail had hardly been used and should be fine for use, although we did identify a problem with it which needed to be addressed.

John came back with a quote which included five different options in sail cloth and cut. Maria and I pondered this for a while and eventually decided that we didn’t want the cheapest but weren’t sure we could afford the Dyneema Tri-radial sails which we assumed were more targeted at heavy users and racers. We returned to speak to John about our choices and to place an order. John is incredibly experienced and we have a rule that we always take advice from people who know what they are talking about. John is also a good salesman and convinced us that far from being race sails, the dyneema were the hardest wearing and for the length of trip we had in mind were perfect since they would retain their shape for the entire journey and wouldn’t need replacing – nice upsell! 🙂

Maria also wanted to change the UV strip as she continued her personal crusade to remove the colour dark blue from Mariadz! The new uv strips matched with the hull stripe and cockpit tent.

We decided to get these done and then to put the old sails back up for the last year in the UK.  Shortly before departure we would replace our old sails, retune the rig if required and check the sails so that we were ready to go.  For that last year, the sailmakers had offered to store our new sails.

Our flexibility meant that John was able to help us with the price and paying for them.

For our standard sails, we agreed to have a new main, staysail and headsail. The existing extra headsail, for our standard twin headsail setup, has barely been used and so we decided to keep that. The headsail was the same Yankee cut that we had originally, we had explored making this larger but in the end we agreed to stay as we were. As for the main, we did not have vertical batons in our furling main. We have seen these on other M54 but at least one had significant issues with furling the main and we were happier not adding to the risk of a sail jam potentially at the risk of a little performance. Finally, we agreed that we wanted storm sails for heavy weather, although our staysail is about the same size as the largest storm sail. It helped us define a smaller storm sail which should mean we have sails for all conditions, although we don’t expect to be out there in bad weather by choice!

The sails were ready when Mariadz was put back in the water in August 2021 and once the rig had been refreshed, more on that in another blog. We were then in a position to have a test sail. This didn’t need to be too long, just up and down the river, checking the different points of sail. John was able to confirm that the sails were performing as expected and we were looking forward to seeing what Mariadz would do now on longer journeys. Maria is famous for not being a racer but being like Gandalf in Lord of Rings, standing there saying, “You shall not pass!”, the new sails should help ensure that remains the case.

The sails came off after the test sails and were stored for the winter before being put back on for our departure from Levington. We have since had the opportunity to test the sails in normal conditions and couldn’t be happier. Mariadz is flying through the water and feels a lot quicker. The sails are a lot better and it has really demonstrated how baggy our old main in particular had become. We couldn’t be happier and they look gorgeous too!

Fixing the engine – the nuclear option

Regular readers will have known that we have had a number of attempts at fixing our 3,000 hour yanmar including a new heat exchanger, all new cooling pipes, etc etc.

We were still unhappy with it and had disconnected the heavy duty domestic alternator which may have been part of the problem. Also, with our change to lithium batteries, we needed an alternator that the hungry lithium wouldn’t destroy or worse still cause to burst into flames.

The nuclear option is not stealing an engine from a nuclear submarine but actually was biting the bullet, admitting that we would never be 100% happy with the old engine and deciding to replace it for a new engine! Eye wateringly expensive but the equivalent of taking off and nuking them from space as they said in Aliens. As they said it was the only way to be sure!

Once you have chosen this path, there are a number of factors to consider. The easy part is the engine choice: the modern equivalent of our old engine is the 4JH110 which is a 110hp, turbo, common rail engine which is smaller than our old engine, a little more powerful (10%) and being brand new likely to have all of those ponies whereas our old engine was probably working at a lot less than the labelled 100 hp. Of course, a more powerful engine can cause more problems since you need to exercise a marine engine to avoid maintenance problems later which was also why we didn’t go any more powerful than the 110. We have seen a lot of people upgrade their engines and then struggle to get the benefit especially as the hull speed of the yacht is quite a limiting factor.

Unfortunately with the larger Moody yachts, the access to the engine is through the cockpit floor which means the removal of the cockpit table, the steering binnacle and then the floor. With the setup on Mariadz, you then needed to remove the Onan generator and the table it sits on before you could access the engine. Suffolk Yacht Harbour (SYH) were engaged to do the work to remove everything to get at the engine. initially, the cockpit floor has to have its outer seal removed and then the screws holding it in place need to be removed, the photo shows where these are but once removed the floor comes out quite easily.

The East coast dealer for Yanmar is French Marine and we engaged with them to understand the costs and what needed to be done. with our recent change to lithium we decided to supply our own lithium-friendly alternator and went with the Balmar 60-series 24V70A alternator with MC624 regulator and temperature sensors. This alternator recognises when the lithium is being too demanding and shuts itself down for a while to recover. It is also able to put a lot of power into the batteries quickly, an advantage when you are hoping not too run the engine for too long.

The work started, after some delays, and everything was going swimmingly. The old engine was ready to come out and would be available to sell, something that French Marine offered to help us with.

When discussing the work, one of the drivers was to have a quieter experience within mariadz when under power. To that end, we agreed to have all of the insulation for the engine room replaced. That would improve the soundproofing and hopefully make the engine even quieter.

While the engine was out, it was also a perfect opportunity to paint the engine room bilge. Once the table for the gennie was removed, we found some corrosion so we took advantage of it being out to have it regalvanised. You start to see how one job can lead to another… all of them seem quite reasonable in isolation but soon add up when done together. The new engine was in quite quickly but as part of the fitting of the shaft a problem was found with excessive wear, not surprising, I guess, after twenty years but a new one had to be sourced and fitted. We then get to the prop which had been out of the water for a while and had apparently seized. Clearly sending that back to the manufacturer is very sensible with everything else being replaced but again not factored into the project originally. It does mean that the entire drive train has been replaced which has to be a good thing.

Unfortunately, while all this work was being done, somebody left the companionway hatch open for an entire weekend of heavy rain. Some of the interior was under an inch of water which damaged the interior wood that we had just had redone in maple. This was very disappointing and caused additional expense especially when no-one admitted liability. Josh at Suffolk yacht harbour agreed to refurbish the companionway steps which had also been damaged by people walking on them with heavy shoes and damaging the edges, not a problem we had experienced before since we are a shoeless boat. This was a kind goodwill gesture but didn’t completely sweeten the taste of having to repair a lot of interior wood in the saloon. We were already having work done in this area so it extended that project and now looks excellent but wasn’t something we were intending to do.

You start to see how these projects add up and blow budgets. that may appear to be a repeat of what I said earlier but it seems so important it was repeating!

As an example, the generator is only a few years old and doesn’t have many hours however, we had a minor interior leak from a corroded part of the generator which needed to be replaced and we decide to have the whole thing properly serviced and checked before being out back into the boat. So now we know everything to do with the generator and engine have been checked, refurbished or replaced as appropriate and we can have confidence in our setup.

Suffolk yacht harbour then started to do the reverse of the start of the project, refitting the table, putting the generator back before replacing the cockpit floor. It is important that the cockpit floor is sealed correctly, since we know of at least one other moody 54 that had a problem here which caused all kinds of problems for the engine room. SYH did a good job of refitting this, resealing and then wet testing to make sure there were no leaks.

We then needed to commission the engine which was much later once a number of other projects had been completed. Initial work on this by French Marine was great and after a weekend of testing we found a slight leak from the shaft housing which was sorted quickly and efficiently. We now have a gorgeous engine room with two fantastic and efficient pieces of kit servicing our needs.

The whole project of the engine swap was a lot of money but the new engine purrs like Clyde eating his treats. We are also impressed by the engine power and have been keen to use the whole rev range as directed by yanmar during that crucial first 50 hours of use. But what of our old engine, I hear you say. 3000 hours is nothing for a good Diesel engine and there would be others who could use it. French Marine were as good their word and introduced us to someone who needed an engine. We agreed a fair price and I was able to offset some of the cost 🙂

Unfortunately the various delays on all parts of the project meant that we were unable to use the boat as much as we expected and eventually we had to leave SYH prior to finishing the first 50 hours. This meant that we would have to get the engine serviced on our route south to Plymouth.

We hit the 50 hours as we approached Southampton since there had been little usable wind and we had a weekend to make that trip. While in Southampton we were lucky to catch up with our good friends Christian and Jennifer which was great but also got us a couple of recommendations for someone who could service our engine. The second of these was Martin Smith who was friendly on the phone and able to fit us in to a busy schedule. He came on board at the time he said, which isn’t necessarily something we are used to, and did a thorough first service for us. We were really pleased with his work, approach and the result. The bill was also refreshingly reasonable too especially when the job had been quite short notice. An unequivocable recommendation from team Mariadz for Martin’s work.

So we now have a spotless engine room with mechanical parts in perfect working order and it is quiet when running, well as quiet as any boat can reasonably be!

Electrical work

Mariadz was built in 2001, and this was when her electrical system was last overhauled. In the interim, a number of items had been added or removed from the electrical mix and this meant that the switch for a particular piece of equipment was quite random. Apparently, it is logical to switch on the navigation for the 12V charger to be live to charge your phone!  Clearly, there was a lot of duplication in the items on each switch which resulted in more power being used than was required, this would cause us problems on our blue water cruising. And we thought it looked dated! So we spoke to Ollie at Seapower in Levington and started talking about how to redesign the electrical panel.There we’re some features of the old panel we liked such as the outline of the Moody with indicators for the lights being on. However, these no longer worked when we went to LED because of the lower draw of power. A simple change however. This would also provide an opportunity to remove the extra standard horizon chart plotter as part of the navigation overhaul, discussed elsewhere, and also give us room for an SSB.

The new panel has zones to logically group related items together. On the left is power management: the control for the generator, shore power indicators, inverter charger and our victron battery monitoring. Next you have the 240v section which includes areas that can be switched on with the inverter, as well as those that require a power source. We added the water heater into the inverter section, despite its power requirements, so that we could have hot water if the solar was working amazingly. However, a good way to use a lot of power is to leave this on for any time, the bitter voice of experience there! In the middle of the panel is the outline of the moody with h light indicators, bilge pump controls and a single gauge that will show either fuel or water levels. Next up are the 12v/24v circuits including lighting and pumps and then finally the navigation and ancillaries.

Below this panel, there is a smaller panel which houses the vhf radio, navtex and eventually any satellite handheld phone. This also has the main breakers for the domestic, engine, windlass and winches. The return that faces the chart seat has the navigation, SSB and a marinised Sony stereo (our third having gone for standard car stereos previously – buy cheap, buy twice!).

The structure of the panels works well for us and it doesn’t take long to know where to look for something or the standard pattern of lights when on shore power and when sailing. The use of an indicator light and the red border on the switch to show it is on could be overkill but we were happy we would know what was on rather than suffering a power drain because we had accidentally left something on.

All this was done some time ago and the panels were recently remade to cater for the SSB and to remove some redundant kit (an old engine hours dial). So no apologies for bumping up n older blog which has been updated to reflect the current situation.

Batteries and the move to lithium

I had been planning to wait for the price of lithium to come down as these things always do after the first flush of invention. Unfortunately, that doesn’t look likely as the demand for lithium (life-po4) for the motor industry means that availability and prices elsewhere remain high.

However, the technology is definitely the way to go with charge rates high, weight low and usable capacity high too. This is also not the technology that are an explosion or fire risk which seems to be a common concern.

Our hand was forced somewhat since we bought new victron gel batteries in 2019. Being liveaboards with an inverter, we felt fortunate that we didn’t have to constantly go outside to reset a trip if we inadvertently put the kettle on with an electric fire and went over the power limit. The inverter charger would kick in, top up the power required from the batteries and then recharge them when we needed less power. However, there was a price to this convenience. Within fifteen months, our batteries were dead! Firstly we checked that everything was wired correctly and fortunately we have an all victron boat fitted to their standards. We kept investigating and victron agreed to replace our batteries under warranty which was a relief. We all thought we had just been unlucky.

However, nine months later, the same thing happened. We were on passage and a few hours after dark the boat went dark as the batteries died. Fortunately we could run the generator to provide our power requirements. Clearly something must be wrong but we were still at a loss.

Victron again offered to replace our Gel batteries like-for-like but also suggested an alternative. They felt that there must be something going on and that we couldn’t be so unlucky as to have two dud battery sets. They suggested that we upgrade to their lithium batteries which required less capacity to provide more usable power and they felt that we would hopefully not break the lithium! To sweeten the pill, they deducted the cost of the replacement batteries they would have provided and gave us some other incentives in price and some free equipment. It was still an eye watering amount but victron’s charity with replacement batteries wouldn’t last for ever.

However, we still needed to understand what was causing the problem. My current theory is that whenever we used more than the 16 amps coming from the shore power, the inverter pulled from the batteries and then replaced it later, which is effectively a small cycle of the battery. All batteries have a limited number of cycles and every time we used the kettle or marina her hairdryer in the winter it was a cycle, so potentially a number per day. The Gels would have had a few thousand cycles life but these could be being burned up at 10 a day. So in addition to the change of battery type, we also upgraded our shore power cables to provide 32amp power when available to reduce the cycling. That may have worked on its own but traditional mariadz belt and braces we did both!

Unfortunately, moving to lithium isn’t exactly plug and play from lead acid batteries and there are a number of factors to consider. Possibly most importantly is the alternator on the engine. Lithium like to take a charge, all you can give generally. Older technology alternators would just keep trying to give and would burn our very quickly from overheating. The changes we were making were coincide with the change of engine and so I cancelled the standard alternator being supplied and sourced a Balmar alternator with heat sensors from Oliver Ballham at Seapower. This alternator keeps going until it gets too warm and then shuts down. This isn’t too much of a problem for us since we have a lot of solar which can continue to top up the batteries if necessary.

Another area that needs work is the battery monitoring. On our initial test of the lithium we went away for a weekend and by the beginning of the third day had no domestic power at all! That’s just like the old batteries….. what we found were that the configuration variables of our charging systems were not accurate and so they stopped charging the lithium at too low a voltage meaning they weren’t fully charged, but the systems thought they were. We have since adjusted the variables across solar and battery monitoring so hopefully we have these right but there does seem to be an element of tuning. It was disconcerting though since the intelligent lithium batteries have clever electronics, and Bluetooth built in, which means that as soon as they get to a low state, they completely switch off. When this happened we went to our trusty generator which also didn’t start, a battery isolator switch that we never switch off had been flicked over. Still our engine started as always and put enough charge in for us to get going again. We then located the battery isolator problem and were back in business.

We know the engine alternator and the generator pump a lot of power into the lithium very quickly but we have yet to really see if there is any difference in the so,arc performance. In the UK, on a good summers day we were getting 5kwh, or half our battery capacity, from our 720W of solar. This would very much depend on the batteries though since they stopped pulling in too much power as they got fully charged. This often meant that we would switch on the water heater which uses 30A so that we had hot water and continued to maximise the solar. It will be interesting to see if these figures are different with lithium. Although our consumption will be the same, I am hoping that the batteries will take more charge before saying they are full. I will update this blog as we find out more…

In conclusion, we went from 10kwh of gel battery capacity (8 x 110Ah @ 12v) to a little less lithium (2 x 200Ah @ 24v). However, only about 50% of the gel batteries is usable energy whereas the lithium can be discharged safely to 80% so probably 50% more usable capacity in our new setup. These batteries are also half the size and probably half the weight so a lot easier to find them a home. We have yet to use these in anger on a proper crossing but feel more confident we now have a sustainable solution for ourselves,

A weekend of maintenance

We’ve been lucky to get out quite a bit recently but eventually there comes a time when you need to just make sure everything is ok. So no more fun and do some maintenance.

This weekend was our opportunity to do this.  We had noticed a little oil which had mixed with water in the engine room and although there was only a little, we had decided that this needed to be fixed.  Unfortunately, the source of the oil issue wasn’t apparent so step one was going to be cleaning up the engine room so that we could definitively see where the oil was dripping from the engine. DC8E6737-75A6-406A-84EF-F273E3A11A13Maria got some top quality advice on how to do this by cleaning up using Pet Training Pads which soak up the spills really well.  Don’t tell Bonnie and Clyde that they are puppy pads. These allowed me to clean up most of the mess.  That makes it sound easy.  The difficulty is that although Mariadz has some room around the engine, it is not ideal and to dry the floor under the engine, you have to jam yourself between the door and the alternator and try and reach under the front of the engine.  Being a short-arse with short arms and not as thin as a rake doesn’t really help.  It means I am dabbing down the pads using a straightened out hanger but it seems to work.  Having dried out the engine room I then threw some detergent and a little water in to remove any residual grease.  This just feels wrong after you have spent ages drying it out! ED91676B-D694-4F12-BF5A-C8EA3C511034
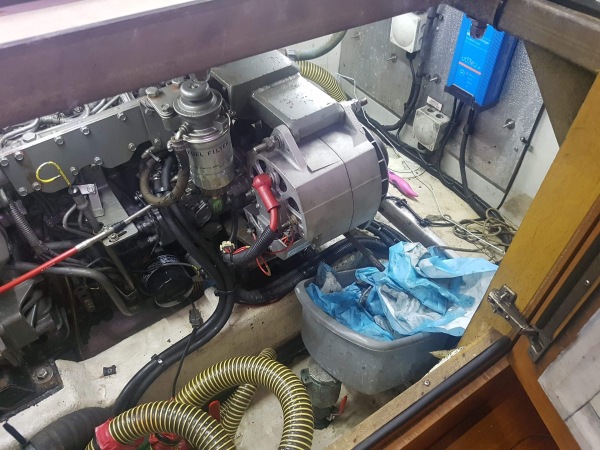
Not least of all because of the alternator shaped imprint on your chest from having to lean on it for so long stretching to dry off the bilge. Interestingly, the mess looked worse than it was with the oil mixed with water. Not so bad an oil problem but the water is another problem we need to resolve. After quite some time, the bilge is squeaky clean which is also a shame because I know it will get messy again.  To make sure I know where the leak is coming from I lay down two puppy pads face up under the engine which will hopefully catch the oil and give a view as to where it is coming from.  The running of the engine is for another day though since we want to make sure that we don’t have a leak when the engine is cold. So next up is cleaning out the bilges of any water.  This could be from condensation, rainwater seeping in around the mast or from a problem with the deck drains or a problem with a through hull or pipe.  All will need checking out. 9424B7FA-2CD0-4723-AA72-18F9C4BD76B0Maria has bought a cheap Wet and Dry Vacuum Cleaner, she likes to shop does Maria! But it is very good and a little quicker than the manual hand pump that I have used in the past so I have begrudging admiration for her purchase.

Maria is on a mission going into every bilge armed with a hoover and cleaning out even a drop of water. She finds some water at the bottom of the mast, which is not unusual. Apparently it is very difficult to get a good seal around the mast, not least of all with the strains a mast goes through with the sails up.  Little regular movements would probably break anything that provided a water tight seal and the gaiter at the bottom of the mast protects from most of the water but some gets through. 53620353-6267-4792-8937-4C42C342573EWe also have some water down by the keel bolts and this is soon gone. Finally, Maria decides that the grey water box is going to be spotless! First clean out the dirty water and then clean the box which looks amazing.  Just fill it with water to make sure that switch is working well and….. nothing… no pumping at all. Maria starts to apologise for cleaning our new switch and breaking it but it can’t be that. I check the connectors and everything seems fine, give them a little wiggle and the pump jumps to live. Right so a loose connection, quickly traced to the live wire. Firstly, I try to reuse the existing connector by bending it back using the new crimping tool, why do we try to botch these jobs?  Eventually, common sense prevails and I decide to put a new connector on it. EEBED97D-1C03-4255-AC99-2AB1DFFFD234 Unfortunately the small box of connectors I have is in the toolkit in the motorhome.  I ask Maria to pass me the keys without being clear and neither of us check, it is only after I have walked a couple of hundred metres to the far car park that I glance into my hands to find the keys for the land cruiser. Ok, all the way back, ask for the right set of keys, both of us check it and I return to the motorhome. Pull out the old crimper, you can’t have too many, and the small box of electrical terminators. It is only as I return to the pontoon clutching these that I recall that I bought a big box of terminators which is in one of the spares areas on the boat and I already have a much better crimper on the boat! So that is 30 minutes of my life I will never get back.  On my return, Maria says she thought it was strange that I wasn’t using the ones on the boat…. bless her for not mentioning it! New terminator and industrial crimper later and we have a positive connection that looks good.  Quick pull on the wires to check and the negative comes off in my hands. Seconds later that one is done too and everything is working as it should.

As we have been lifting the floor boards, one of those truisms comes to the fore.  I have always noticed that a “simple” job always seems to end up in a few more jobs. The cleaning of the grey water box was a perfect example. EC0783F3-B77F-47D6-849D-A7EB1114C7CEOn this occasion, lifting the floorboard and the metal lifter comes off in our hands! This was obviously after Clyde had woken up! Right, longer screws required which is where my reputation as a hoarder comes in well. I have a box of assorted screws, bolts, nuts and washers collected over time.  Of course the one I am looking for takes some searching but it was never in doubt that I would be able to find one that sorted this latest problem out.

Now to see if we can trace the water leaks.  Quite often we have to bleed and prime the water pump for the air conditioning unit in the aft cabin.  Some of the water will be from this process but not much but maybe the pipe isn’t on properly and leaks when the unit is being run? A test shows that isn’t the case. The next test will be the engine.

So a couple of days later, it is time to do some more work on the engine and there is no trace of oil on the laid down pads. Right then, time for a proper test under load.  While in our berth we will run the engine under load for a period of time and see what happens then. Although, Mariadz is tied well in her berth, I decide to add extra springs to spread the load as the engine tries to pull Mariadz out of her berth.  We will be going astern, so away from the pontoon.  Probably better to be heading away from the pontoon if anything gives rather than straight at it! I have set the revs to a shade over 2000 which is good enough for five or six knots in open water and the lines are holding well. Ninety minutes later, we inspect the engine room…. to find some oil dropped off the front of the engine behind the alternator. I have never been so happy to see a problem, it means we can set about fixing something that has annoyed me for some time.

When looking at the front of the engine you can see a line of wet oil coming from where the domestic alternator joins the engine. I am going to ask Lindsay from Seapower to help make sure that we fix this properly but we will go the work together.  A few days later, Lindsay and I are looking at the problem.  It seems that the leak is coming from the cover directly behind the alternator so the alternator will have to come off.  Of course I have had to do this before when replacing the alternator the other year and hopefully the relatively recent fit will make this a simple job.


An hour later, the alternator is off, the cover is off and we can see the culprit. The gasket is damaged and oil is seeping between the cover and the engine block.  Something so simple.  We will get in touch with Yanmar and order a couple of these, fit, test and then we can set about a full service. Tune in next week for the exciting conclusion…. quite exciting conclusion… alright, conclusion.

Sun bed cushions, now for some towels to make sure they are reserved

We spent a lot of time, as part of changing everything from blue to tan, redesigning the cockpit cushions.  Previously, we have had cushions and backs throughout the cockpit but Maria came up with a funky design which was partially backed with loose cushions for the rest. This was a difficult design but Maria is great at imaging these things and designed the cockpit cushions. The first quote we had was from a leading company and the cost was huge, it reflected the work required to get it right and we know that they would be perfect but it wasn’t really affordable for us.  We then found a small company who could do the work for us.  However, we had struggled to get Maria’s design understood by the company doing the cushions.  When they first arrived, they didn’t fit and were nowhere near Maria’s vision. They looked awful, but Maria was able to talk them through how to make them better. At the next visit they were much better. Flushed with success, Maria commissioned the next, much easier, set that would cover the sunbed area and provide light cushions and backs for the push pit seats. Our original supplier seemed confident but, for some reason, he felt that Maria trying to get the design how she had envisioned it, meant that she had changed the design.  Maria’s view was that she had kept the design to be what she wanted rather than something that didn’t work and that wasn’t what she requested. Anyway, with this in mind, we requested three simple cushions, one with a fold, for the sunbed area. James, our supplier, stated that any change in the design would result in additional cost. A little unfair maybe, but not unreasonable since we don’t think we want to change the design, and if we did we should pay for it.  A few weeks later some cushions turn up…..they are nothing like the original simple design! We are non-plussed. We aren’t allowed to change the design, but you can change the design without even telling us! Rather than rectangular cushions we had a large sized cushion that covered the locker and the others fitted around it.  Apparently, this was so that we could access the locker when the sunbeds were down.  There was some logic in this but it made the bed sized cushions a funny shape that no one could lie on without lying on a crease.  Just talking us through this would have avoided the stress, still a lesson learned. Maria is distraught, this isn’t what we wanted and we have a history of not putting up with second best.  To cut a long story short, James wasn’t happy that we wanted what we originally asked for and returned our money and took back the cushions.

This left us in a predicament.  After some time, we had another recommendation for cushions. FCE474F4-C916-4688-B6CE-E0C309C9A206
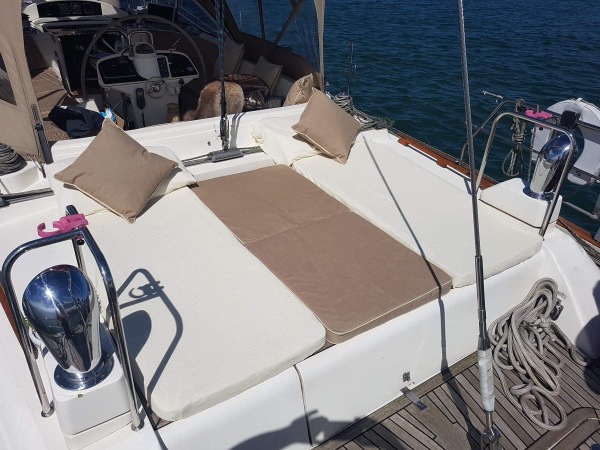
This was Vanessa, who had done some work for some friends of ours, which had been good quality.  However, she is busy which could be a good sign but will m ana delay.  Maria spoke to her and described what she wanted.  It did take longer than we expected but we are really happy with the results, which exactly match our cockpit cushions since James had kindly told us the material and colours. The simple design works really well the fold means that we can expose the hatch for the aft cabin, allowing more air in or as a food or drinks table when you are on the sunbed. Flipping it the other gives a standing area which is often where I am when steering via the autopilot because the visibility is so good.

Although, the push pit seat cushions need a little adjustment but Vanessa has been great and had expected some fitting. More pictures of those when they arrive.

Diagnosing the 30A drain

So at the end of our Easter weekend sailing we had a problem.  Our solar array was designed to recharge the batteries whilst looking after the power requirements while sailing.  On the trip back up at the Orwell, it looked like somewhere we were losing about 30A at 24V. This meant we were drawing power out of the batteries even in bright sunshine. If that kind of power usage was within the boat then it would likely be generating a lot of heat.

We set about understanding the cause of this on our return.  We had already established that it as the second circuit in our bank which controlled winches and the bow thruster.  All of these seemed to work fine which added to the confusion.  By disconnecting the individual elements, we were able to trace the power loss to the bow thruster.  This is located under the fore peak berth. Opening this up we found a few issues. Firstly, there had clearly been some heat on the positive terminal. 20190504_130923
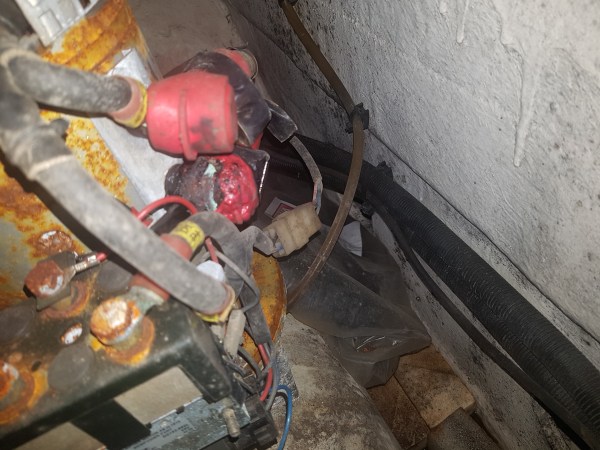
The wiring had melted.  We had this once before in the aft cabin where the wiring for the  davits came into the boat.  On this occasion it was some corrosion within the wiring that had caused the problem.

Our belief is that this stems from well before our ownership of the Moody.  A long time ago, a dehumidifier had been left running on the boat and had caught fire.  This caused damage to the floorboards, galley and headlining.  We imagine that putting this out required a fair amount of water and that when the boat was awaiting repair this water was left to stand with quite a bit of our low down electrical wiring in it.  As the wiring corroded it became less efficient creating heat and then melting parts of the wiring.  This could be rubbish but seems a plausible explanation. So the heat may be the cause of our loss of power but it didn’t explain why this was happening even when the bow thruster was not operating.

We disconnected the negative wire from the bow thruster and there was no drop in the amps going out of the boat. Oh dear. So the amps are going out through the bow thruster into the water. Fortunately, this circuit is only switched on when we are sailing and not when we are berthed or anchored so at least we haven’t done too much damage to our neighbours but this could also explain why our anodes were eaten through within fifteen months.  May be this had been going on for longer without us noticing.

Potentially we could have tried to repair the existing bow thruster drive unit but with our plans, this didn’t seem sensible, not least of all because cost wise a rebuild would probably have been a similar cost to a new one. 20190504_130710
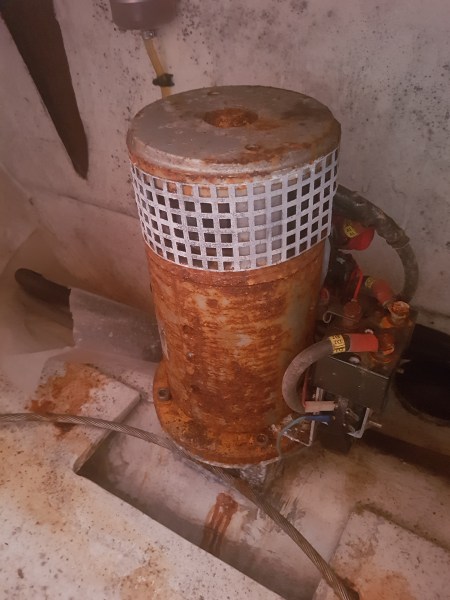
There was also quite a bit of surface rust of the bow thruster too which in an area that is mostly dry seemed strange – maybe reinforcing our theory about the fire.

There was some concern as to whether the drive unit would detach from the housing or whether we would have to come out of the water to do the work.  Fortunately the combination of corrosion X, WD40 and a little time worked wonders and the bolts could be undone to take out the old unit.  The new one was a lot of money but I guess now we have peace of mind.