

So it’s the time of year when we hunker down for the winter and I am keen to make sure that we have a stress free winter so there are some more essential preventative maintenance jobs that need to be addressed.
First is the grey water box, of which we have two on Mariadz. These combine the waste from the sinks and showers into a single accumulator box for feeding into the grey water pump for pumping overboard. During our ownership, we have had a number of issues with this system. Firstly, the pump was taking an age to pump out a relatively small amount of water. We changed the whale gulper pump to a larger capacity pump (Whale Gulper 220 to Whale Gulper 320
for those that know the pumps). As part of this the pipe work to the pump was changed to a wider bore. This made a difference but performance degraded quite quickly and it was taking a minute to pump out. The 320 we had was also very noisy and occasionally seemed to jam. I then investigated the pipework to the hull and discovered at the right angle joint prior to the skin fitting that two plastic screw head covers had become wedged which acted as a very effective valve limiting the output from the pump. This returned the system to “ten second bob”.
However we were still unhappy with the noise level of the pump. I spoke to whale who offered to review the pump since it was still in warranty. Fortunately i had a spare 220 pump that could act as a replacement. The difference was amazing. Prior to the swap, you could hear the pump anywhere on the boat and it was a conversation stopper in the saloon. Afterwards, it was so quiet that you have to listen out for it! Whale diagnosed the problem with the 320 which was a manufacturing defect around the screw area that driove the pump and provided a new replacement, good customer service. I haven’t fitted it yet because the 220 is doing such a marvelous job.
I digress.  The main gray water problem we have on the boat is caused by two people showering on board every day. The soap and shampoo gathers in the accumulator and solidifies into fatty lumps. These clog up the float switch and eventually it stops working causing smelly grey water to seep into the bilge. Cue clean up, complaints about smell and lots of stress for me.
The solution for us is to give the grey water box a clean out every three months. I can remove the white deposits and floating lumps and clean up the box, ensuring no smells, and a happy Maria (very important). This isn’t officially classified as a “blue job”. Doing this has worked very successfully for the last few years with no unfortunate accidents.
Next up are the valves for the through hulls below the water line.  You will recall that all of these were changed as part of the summer refit. Now our job is to keep them in peak condition. To do this we make sure that they do not jam. So my job throughout the year is to open and close the valves on all twenty through hulls below the waterline. We do this every three months or so and check for stiffness in the valve. They are also thoroughly serviced as part of our summer haul out. All of the valves closed and reopened easily so again we have hopefully not got any issues there.
The next task is not traditional regular maintenance but has gone wrong twice in two years so maybe it is becoming regular 🙂 . Our hot water heater is used constantly since we have two showers a day and washing up every day. A few weeks ago our earth connection on the electricity tripped. By switching off parts of our electrical system this was traced to the hot water heater. On investigation there was water in the top of the heating elements signifying some kind of leak. I switched off and carefully dried out the electrics and this worked well. But a few days later it happened again and the water had returned around the electrical connections. We decided to replace the heating elements which is a relatively low cost solution but while we waited I decided to dry it all again. It took a while to get the part source down and also coordinate Ollie from Seapower with my diary so that I could be there, i will be able to address this in future rather than just diagnosing. We swapped the element and electrical control.  All seemed well but a couple of days later we didn’t have any hot water….. when I pulled the cap from the electrical area, I noticed that the reset hadn’t been pushed so we hadn’t probably been heating our tank for a couple of days and hadn’t noticed that it wasn’t reheating. We need to keep an eye on it to make sure it isn’t a problem with the cutout or the tank getting too hot but at the moment we are back to piping hot water.
The last part of maintenance that we attempt is to make sure that the filter for the raw water feed for the toilet is cleaned out. The jabsco pump has an unusual locking 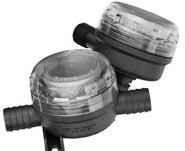 mechanism with a black clip that’s holds the pipe into the pump. This took some time to work out when I first had a blocked filter! The Jabsco Inline Filter
 is also connected using this mechanism but the cap just needs unscrewing and the filter inside cleaned out. It’s a good idea to make sure that the through hull is closed when this is done or the bilge will get a quantity of sea water while you frantically try and close the valve. The key when putting it all back together Ian to be v Ray carful with the o-ring or you will get a leak. To be fair a replacement isn’t difficult or expensive but it is annoying to have to do this because of a trapped o ring. And nobody likes a trapped o ring!
Finally, we have always had a small pool of fresh water under the floorboards near to Maria’s side of the bed, and adjacent to the heads. This had defied investigation for a long time and we had tried many things. Was it a lea from the lazarette? Was it a leak from a deck drain? Was it condensation from the kitchen extractor fan pushing hot air through a cold void? In the end we noticed a slight leak from the water fittings in the sink. Having sorted this with PTFE tape, we now have no water in that space.  Of course we later found a similar leak in the galley sink but hopefully we have addressed these leaks. My standard approach with these kind of leaks is to leave toilet paper around the area so that we can check if the leak returns, at least for a little while. So far so good!

Adam, a few years ago we put a y valve on our sink and an extra through hull fitting in. Since then we have never drained the kitchen sink into the grey water tank which made a remarkable difference to the amount the grey water tank clogged up.
Keep up the jobs and the writing. All very similar here, just doing them in a tad warmer climate!
I appreciate learning about your preventative maintenance routine.