
So inspired by a video on facebook for a very posh dock box and with Maria’s upcoming birthday on the 16th August, necessity became the mother of invention and I decided to MAKE Maria’s present this year.
Firstly, like any parent, Maria will have had presents made for her by the girls when they were very young, I am hoping that my attempts achieve the quality level that she is used to…..
In the video, some flat pack wood miraculously unfolds into two steps with a lid to a box for shoes (or more likely junk!). The steps look very stable as she hops onto her low freeboard yacht….does she really need steps at all?? In the comments to the video there were some questions raised as to how much such a box would cost and the answer had come back as $3,000! I have to say the box does look beautifully made but if you are willing to pay that for it, I would like to introduce myself and discuss potential charitable donations or personal investment opportunities.
So there has to be another way….. and please read to the end to see an unbelievable offer!
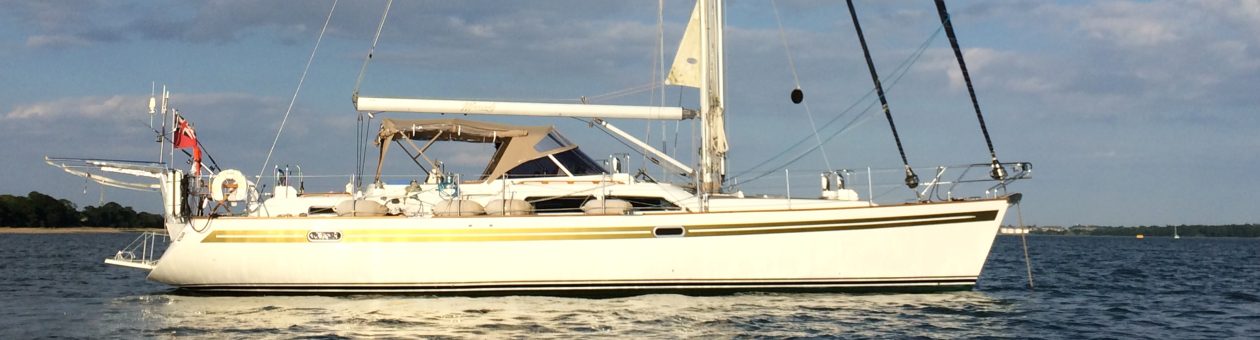
Mariadz, as a Moody 54, doesn’t have exceptional freeboard for her size but it is still well over a metre to the water line and nearly a metre from a floating pontoon to the deck. Maria and I are a little vertically challenged too, which meant when I snapped my Achilles Tendon or tore Cruciate ligaments, it was tricky to get on board – in the end you have to sit on the rail and swing your legs round.
But do we need this? At the moment we have a throne on the pontoon. This is a huge wooden staircase to the boat that works really well but will be left when we start our travelling. So potentially we would need something for when we are travelling and Maria had taken a shine to this video when it came out. Surely I can work something out and put it together for less than that!
 I have been fortunate to have Pete and Linda as neighbours
 for the last two years and one of the things I have noticed as they fit out the beautiful Haven Voyager is that Pete designs a lot in cardboard before making it or buying it. This gave me the inspiration to mock up the steps prior to buying any wood or hinges! I can also thank my son Matthew for drinking the cider that made this all possible.
The model worked really well from the wood perspective but didn’t give me a great view of the problems I was likely to have with hinges. You need two types of hinge for this design a flush fitting hinge which helps with anything that goes out to 90 degrees and a butt hinge for joints that go out to 180 degrees.
So, here he we have the Mariadz designed Magic Pontoon Steps (patent pending 😉 ),
{drum roll please}


So what do you need to make these fine pieces of modern design?
The measurements below are based on producing steps that are 60cm tall (Height) with a first step at 30cm. The depth (thickness) of the wood is key and I have assumed 12mm (woodwidth) but will also explain below how the sizes are made up so that people can adjust as necessary. Dimensions are Length x width and all measurements and I have rounded up the woodwidth to 15mm for calculations for ease of cutting and also because this gives a little space which the hinges are likely to require anyway.
Wood – (B&Q do a fantastic cut to size service which is very accurate)
- The back – 60cm x 60cm [(Height) x (height)]
- The concertina sides (4) – 60cm x 28.5cm [(Height) x (Height/2 – woodwidth)]
- the top 1 – 60cm x 10cm [(height) x (width*7 + a bit?)] – the width is what provides the top part that closes the pack and so you want to be too much rather than too little.
- the top 2 – 60cm x 50cm [(height) x (height – top 1 width)] – best that the top is cut from the same sheet
- Steps (3) – 30cm x 60cm [(height/2) x height)]
- small step sides (2) – 30cm x 30cm [(height/2) x (height/2)]
- top bars (2) – 45cm x 45 cm [(height – top 1 width – wood width*4) x (height – top 1 width – wood width*4)]
hardware – (I chose 50mm brass hinges)
- 10 Butt hinges
- 14 flush hinges
- 12mm screws (100) – check that the hinges don’t come up with 16mm screws, or you are through the wood!
- 16mm “ish” screws (6) – these need to be less than (2*wood width)
- magnetic catches (2)
- anti slip tape
Considerations/Steps
 There are basically three types of joint in the design. The outside of the box
  requires a joint that forms an L so that the top of the box is supported on all sides for stability. This means that the flush hinges need to be brought in by the width of the wood and recessed into the wood to provide a flush finish (I would now recess these differently to the picture with the larger part of the hinge being recessed but I did the first as in the picture and wanted to stay consistent at least on the inside of the box). Two of the concertina sides are joined to each side of the back using this method and the other two are joined to the top step in the same way, I used two hinges for each joint irrespective of size. Having built the U of the back and two sides and the same U shape for the front, we can join these together with the butt hinges. You now have a box with one end which is only half covered and has the front of the top step. We can now fit the top step itself, which is the top of the box, by fitting two flush hinges onto the top edge of the back on the outside and then the smaller top piece can be fixed. The larger top piece is then attached to the smaller with two butt hinges (on the inside). Our top step is taking shape. Now to avoid any unfortunate accidents it is a good idea to attach two bars on the underside of the longer part of the top step. These will stop the concertina collapsing inwards. They should be mounted a wood width from the outside edge and have at least a wood width on the outside edge at the front.
Now to do the bottom step. We already have the facing for the top step on the box so we need to make an L shape with our two remaining step pieces of wood using flush hinges and again positioning the hinge so that it forms an L when opened. Now we can join this L to the bottom edge of the top step which forms part of the box, , using the flush hinges, which should allow the entire step area to fold up to the top of the box. The next step is to attach the small step sides to the bottom of the box under the steps so that they fold in and then come out under the steps. In order to ensure that the bottom step sides stay in place, I used magnets on the inside of the small side pieces to lock it into the back of the bottom step. My steps are untreated so far but the plan is to get this done too since they will be outside a lot of the time.
Finally, put anti-slip tape over the steps and top, we don’t want any accidents. At the end, you should get the following..
You can see the video was done before the protection or anti-slip was applied, I’m just a little premature I guess….. A month later, I have used International Paints Woodskin to waterproof and protect the wood, Anti Slip Strips
to stop any accidents and the boat name in gold, which isn’t too clear with the wood colour unfortunately. The final element is a weathermax bag for it to go in, and I’ll probably throw some silicon sachets in there.
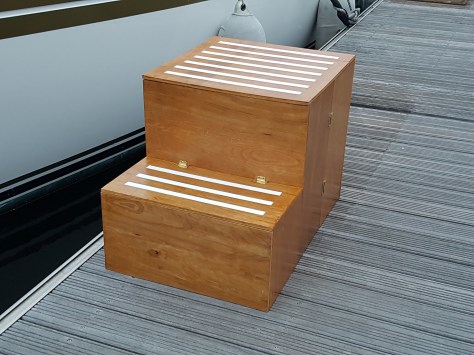
So the steps are done. The size works well for us since we have 90cm above the pontoon to the deck and it means three same sized steps and you are on board, probably useful that they are all the same size in case someone isn’t concentrating. As an alternative and nearer to the example from the original video, the steps could have been a little smaller, since the overall dimensions of these steps are 60cm x 60 cm x 12cm. It is quite easy to have the height at 40cm or 50cm, and hopefully the explanations above will help to explain how to do that.
So now for the unbelievable offer. So anyone seeing the original video of the deck box will know it costs $3,000 (but it is a beautiful piece of art, the Rolls Royce of deck boxes). I would be happy to make the Magic Pontoon Steps to the quality you have seen in the videos, to an agreed, realistic size, for £300 + delivery (feel free to email us at mariadz@mariadz.com). I know, I know, I am robbing myself. Clearly Maria’s special steps cost four times this, they are a present after all! For those who prefer to go it alone, I hope my instructions above help.

One thought on “Magic pontoon steps”